What you are setting up
AArtners onboarding takes you from ASTRO member to published storefront through several sections. You will:
- Join — confirm you have rights to offer your work and build your public artist profile
- Artwork setup — upload artwork and name your prices per commerce tier
- Review offers — review the checkout-ready offers ASTRO creates from your tier choices
- Storefront link — copy your public storefront link (for Stripe)
- Program payouts — connect payouts through Stripe
- Publish — run the publish checklist and go live
Nothing goes public until you complete the Publish section.
Your storefront URL after publish: https://www.theASTRO.org/art/{your-slug}
Before you begin
| You need | Notes |
|---|---|
| ASTRO member account | Sign in with email at /auth/request |
| Rights to the work you upload | You affirm this in the Join section |
| A high-resolution image file | JPEG, PNG, WebP, or GIF — up to 12 MB |
| Legal name | Used for Stripe Connect payouts |
| Bank-ready identity | Stripe will verify you in Program payouts |
Language to expect: You name your price (what you net per piece). ASTRO adds its fee and any production costs on top — you do not pick a commission percentage.
Sections overview
| Section | What you do | What “done” means |
|---|---|---|
| Join | Public name, legal name, rights affirmation; slug, location, bio, cover image | Artist record + profile saved (2 screens) |
| Artwork setup | Image-first intake (up to 6 screens) | Work saved; offers materialized |
| Review offers | Review / edit checkout offers | At least one active offer |
| Storefront link | Copy storefront URL | Ready for Stripe website field |
| Program payouts | Stripe Connect onboarding | Payouts enabled |
| Publish | Publish checklist → Publish | Storefront live |
Resume behavior: If you leave and return, ASTRO opens the section you still need — for example, artwork saved but no checkout offers yet lands you in Review offers before payout setup.
Join
The Join section has two screens (shown as "Join — step 1 of 2" and "step 2 of 2").
Join — Welcome to AArtners
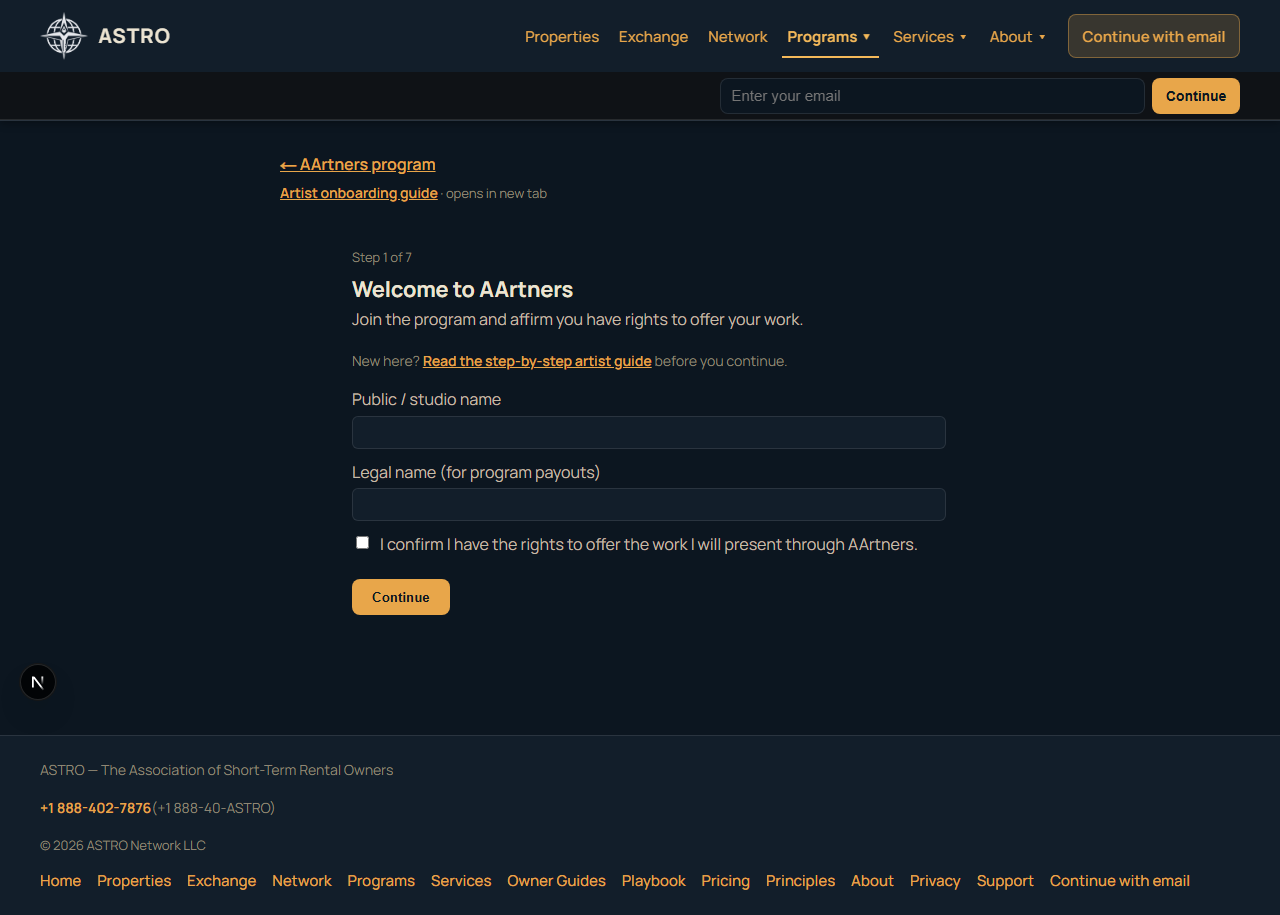
- Enter your public / studio name (what buyers see).
- Enter your legal name (for payouts).
- Check I confirm I have the rights to offer the work you will present.
Tap Continue to create your AArtners artist record.
Join — Public profile
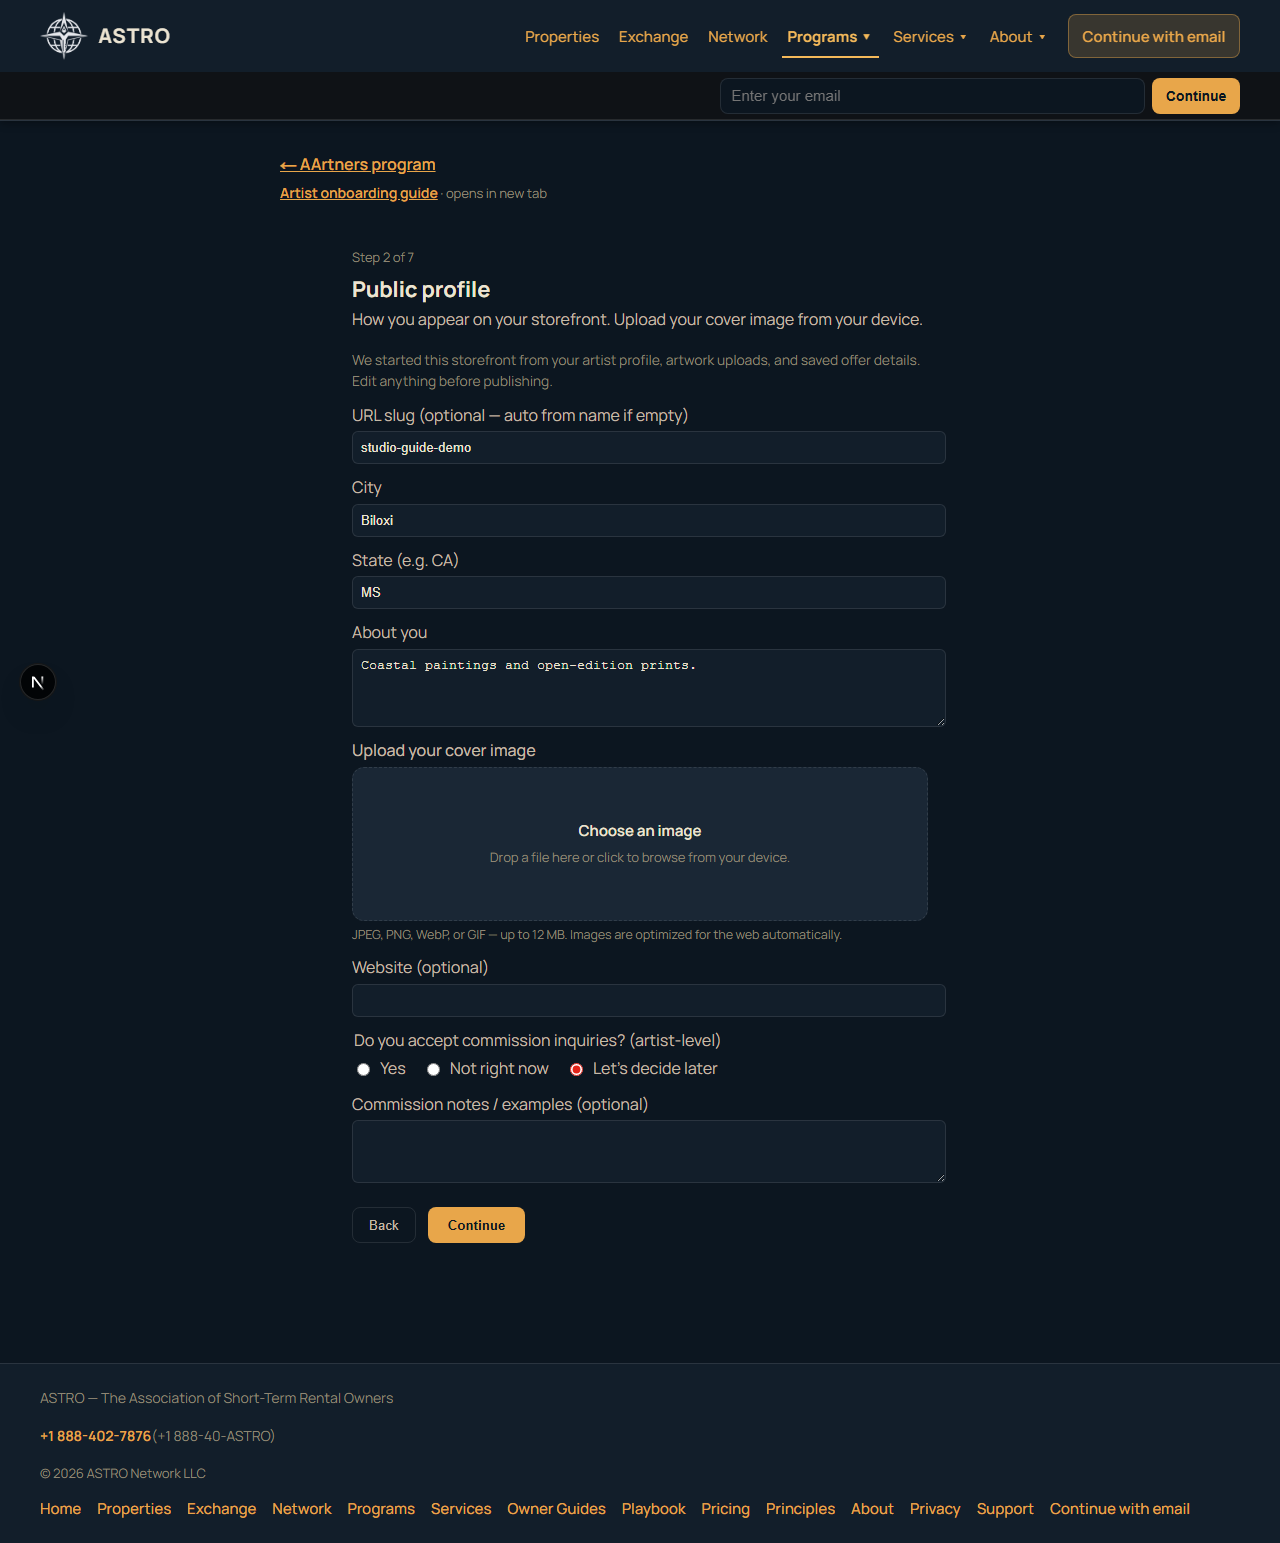
- URL slug — becomes
/art/{slug}. Leave blank to auto-generate from your name. - City / state — shown on your storefront.
- About you — short bio; edit anytime later in Manage.
- Cover image — upload from your device; this is your storefront hero.
Commission inquiries are an artist-level setting (not per artwork). You can set that here or later.
Artwork setup
Progress shows as Artwork setup — 1 of 6 through Artwork setup — 6 of 6.
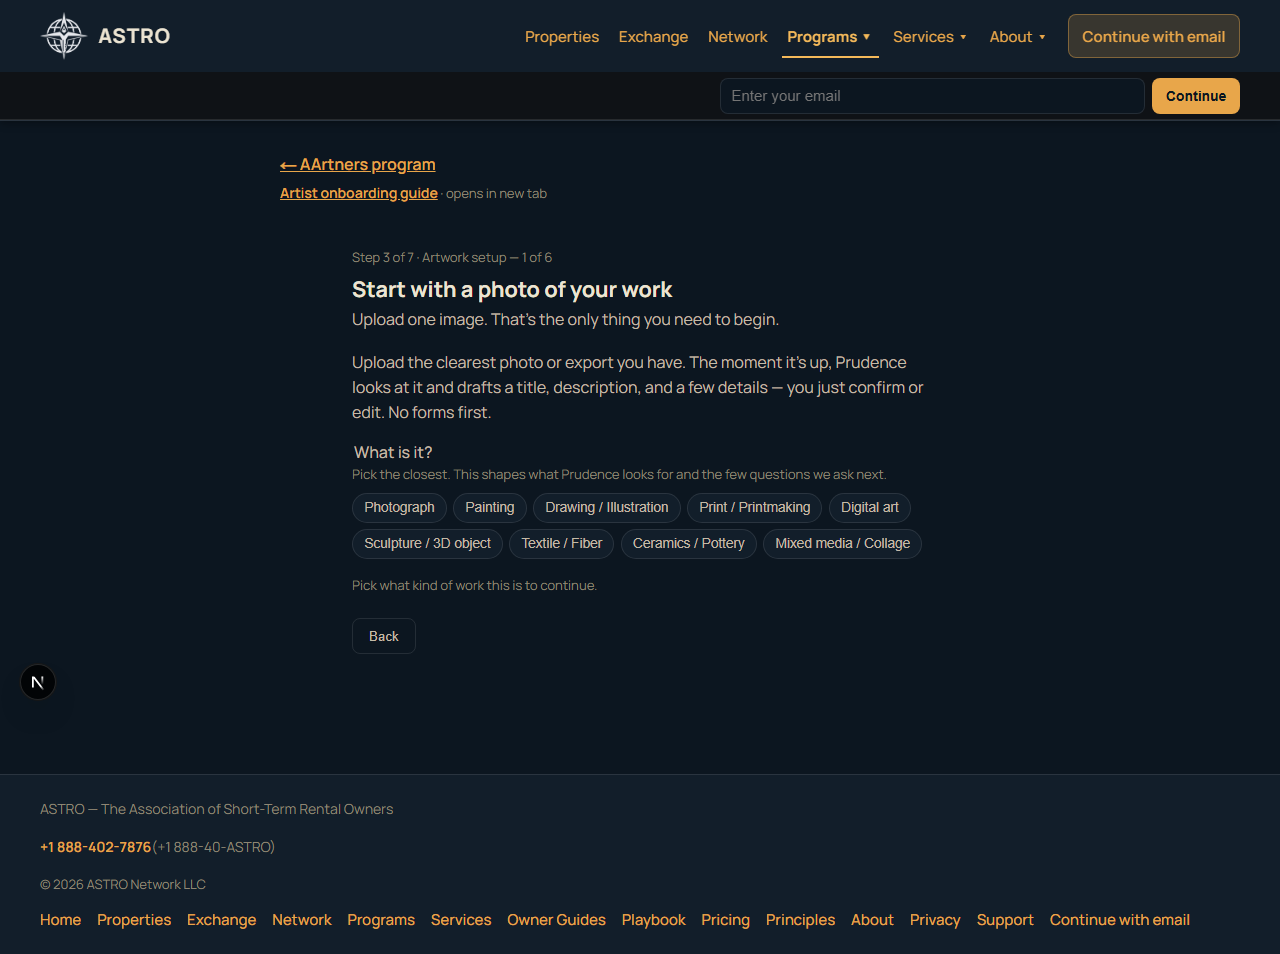
3A — Start with a photo
- Pick what kind of work it is (painting, photograph, digital, etc.).
- Upload your best image. ASTRO stores a private master for fulfillment and creates public display sizes.
3B — Prudence describes (you confirm)
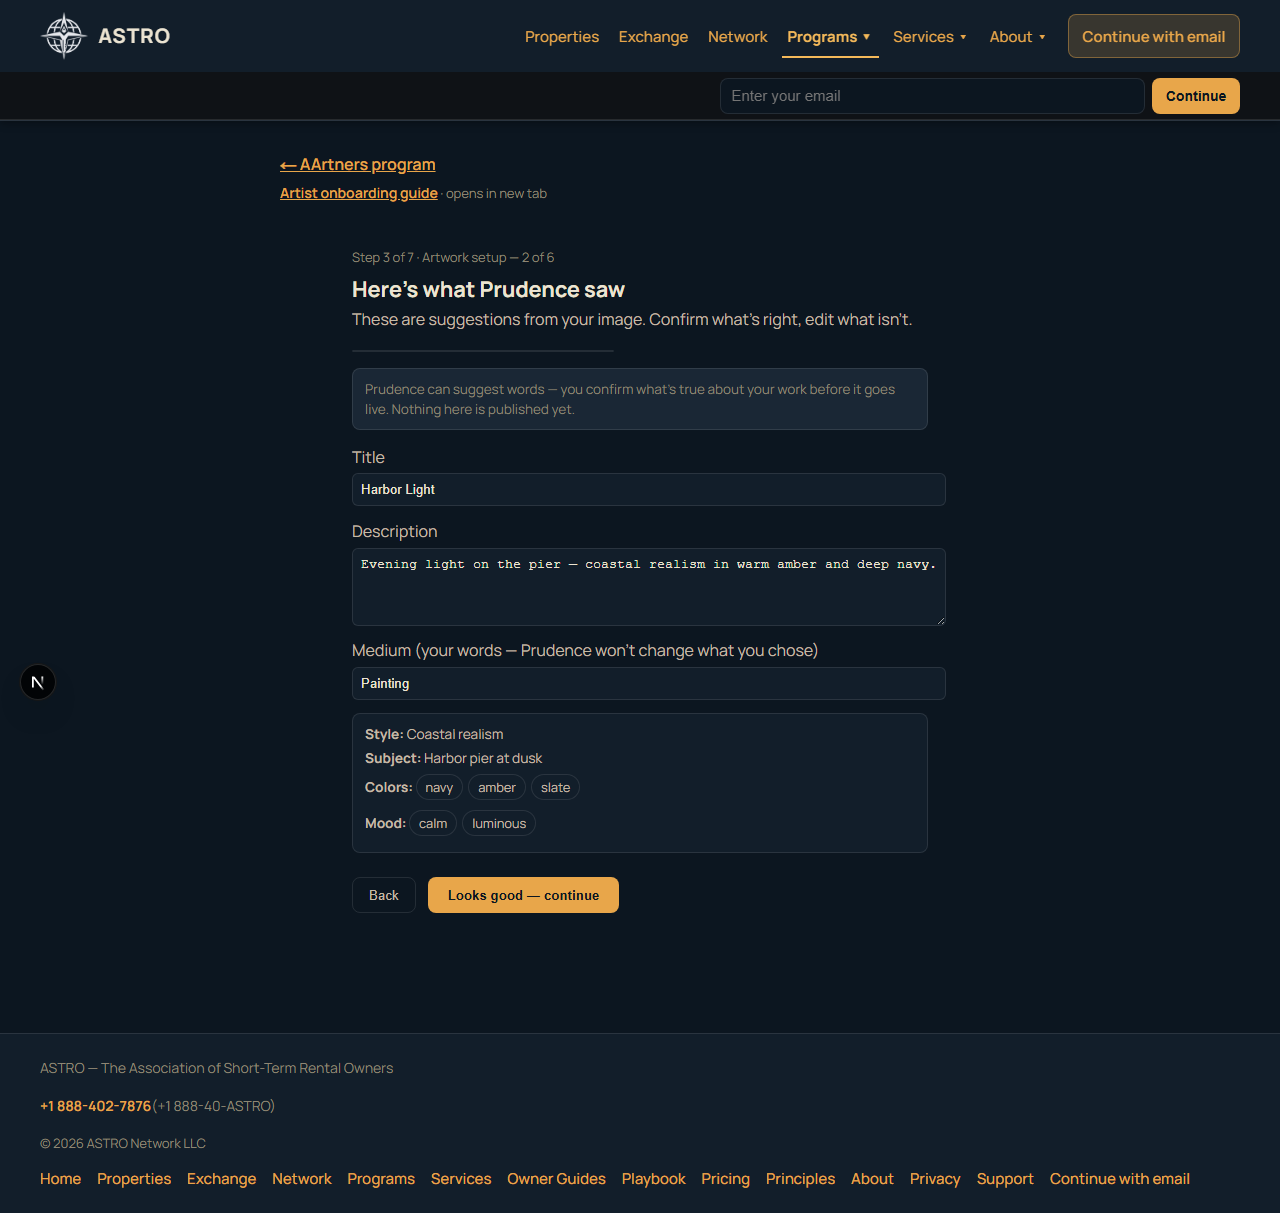
- ASTRO suggests title, description, and details from the image.
- You confirm or edit everything — suggestions are not published as truth.
- A soft note may appear if the image read differs from your medium choice; your declaration always wins.
3C — How this work participates

Choose gallery only, storefront only, or AArtners program eligible. Sale tiers, reproduction rights, and fulfillment are handled on later screens — not here.
- Gallery only — show the work without offering it for sale now (no checkout product).
- Storefront only — sell through your artist storefront using the tiers you pick next.
- Program eligible — may enter selected program opportunities when available; you approve each one.
3D — What can buyers get?
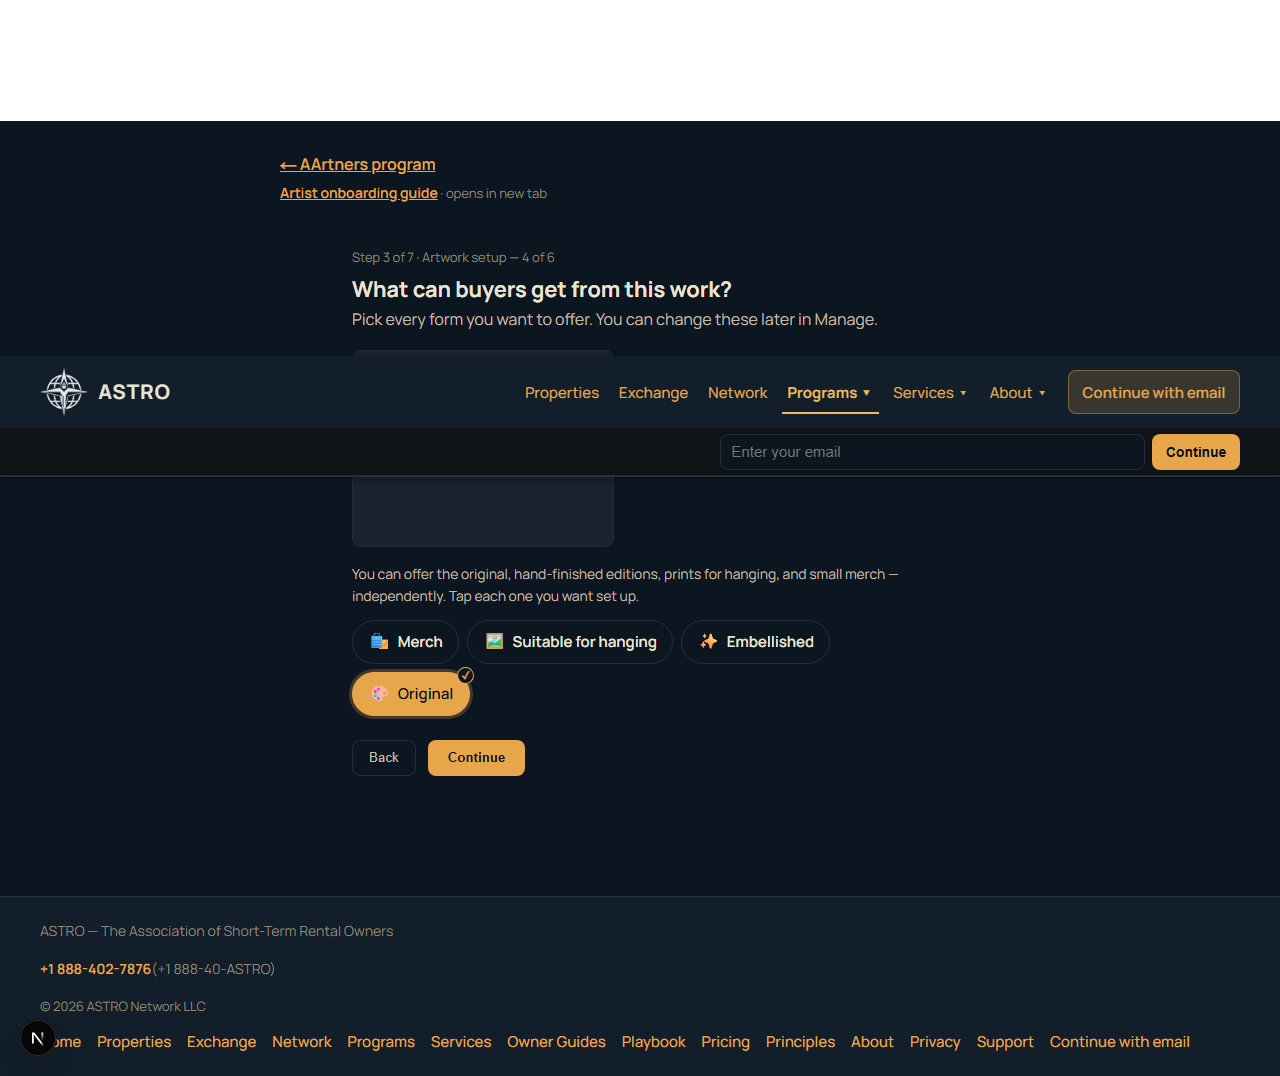
Pick one or more commerce tiers (storefront or program-eligible paths):
| Tier | Meaning |
|---|---|
| Original | One-of-a-kind piece for sale |
| Suitable for hanging | Authorized fine-art prints |
| Merch | Items like posters (v1 focuses on poster SKU) |
| Embellished | Declared in setup; checkout not available in v1 (you will see a clear notice) |
3E — Structure per tier
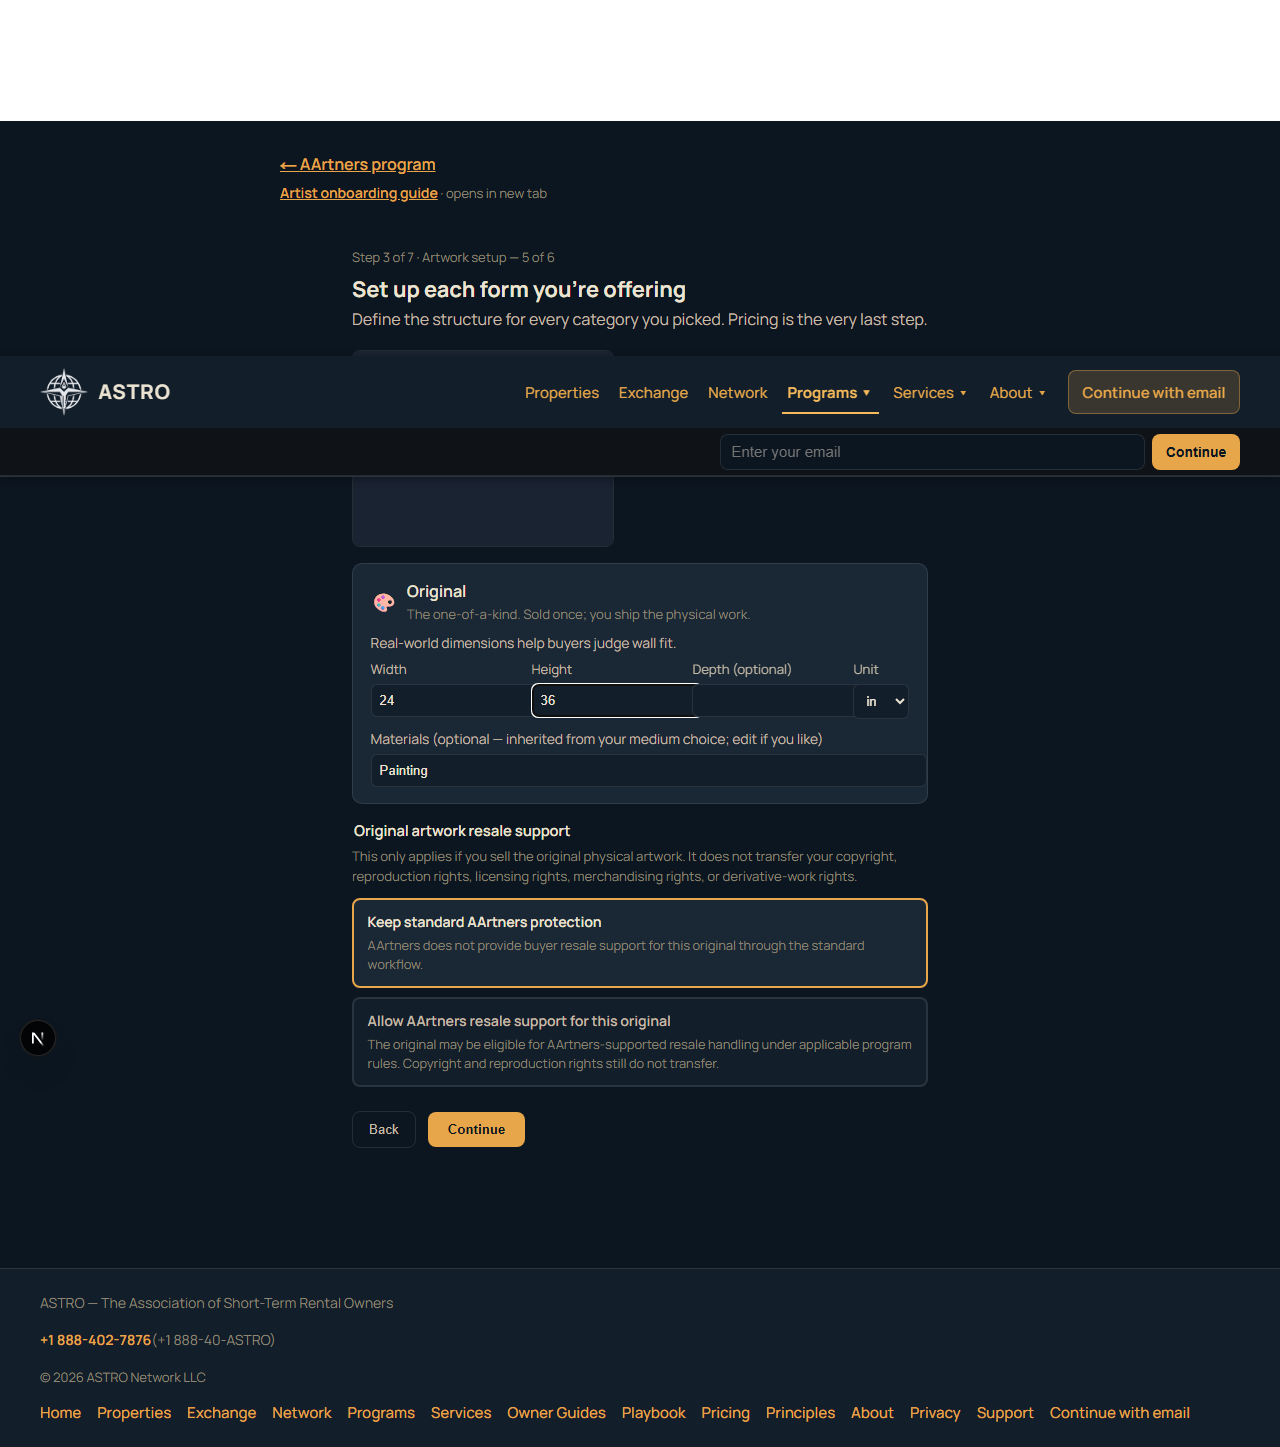
Set dimensions, sizing policy, enabled merch SKUs, edition details — only for tiers you picked.
3F — Name your prices
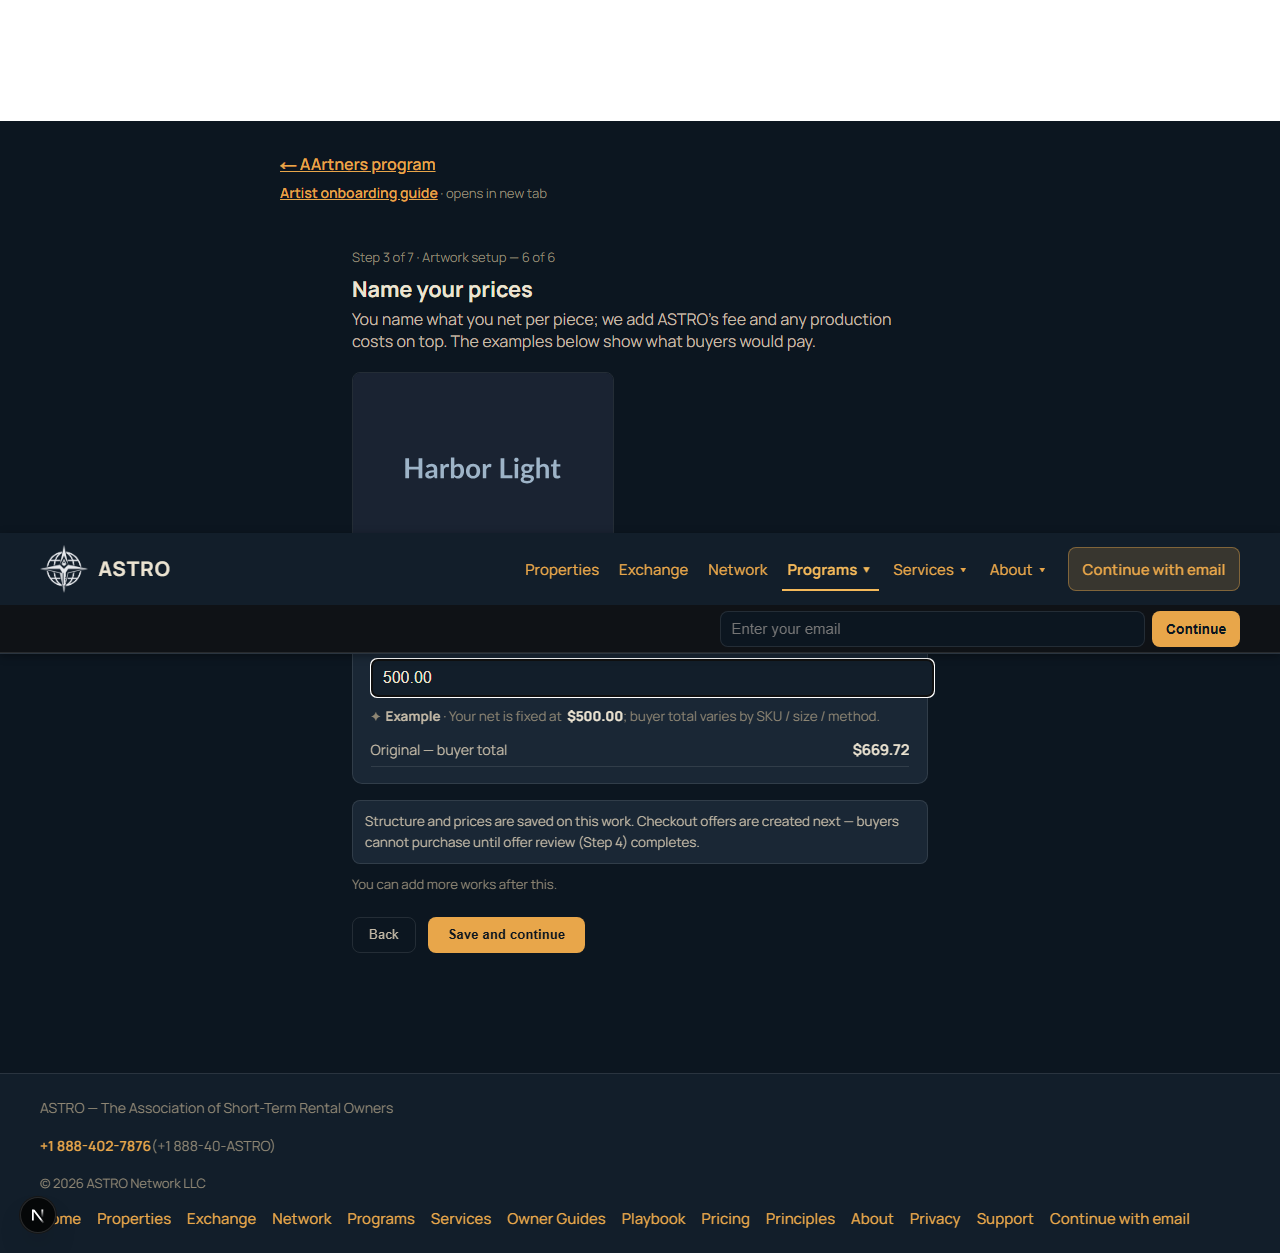
- Name what you net per tier (USD).
- ASTRO shows examples of what buyers would pay (fee + production on top).
- End-of-step note: Structure and prices are saved. Checkout offers are created next.
When you Save and continue, ASTRO:
- Saves your work
- Materializes checkout offers from your tier prices
- Sends you to Review offers
If materialization partially fails, you still land in Review offers with a warning — fix offers there.
Review offers
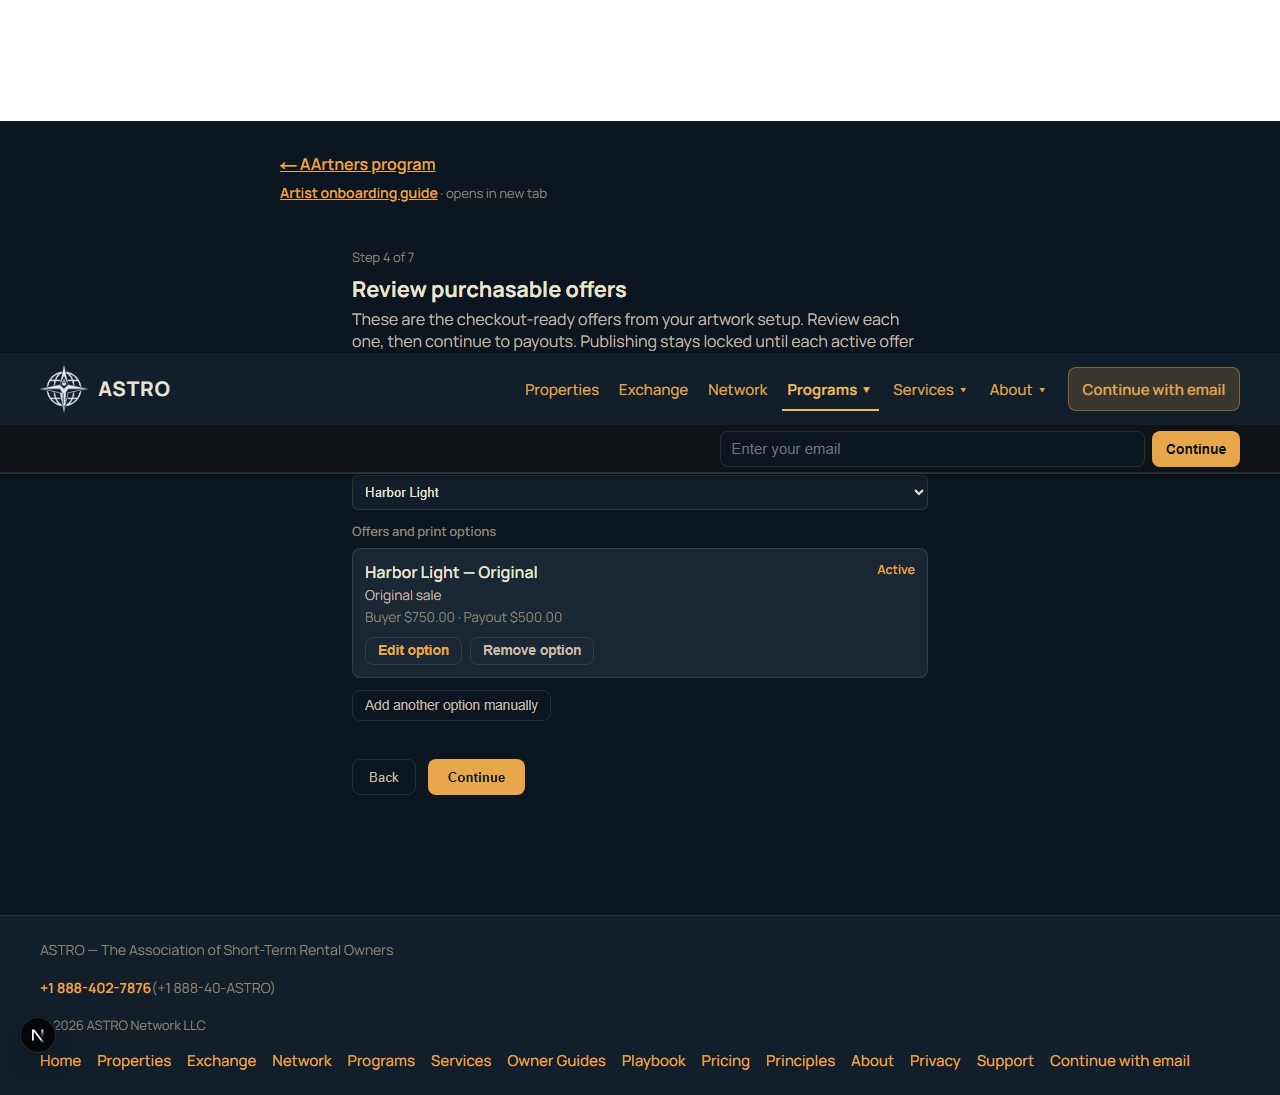
This is not a second data-entry form for the same tiers. ASTRO already created offers from Artwork setup.
- Review each checkout-ready offer (original, print, poster, etc.).
- Edit or remove anything that looks wrong.
- Add another option manually — escape hatch for edge cases (collapsed by default when offers exist).
You need at least one active offer before publish.
If artwork is saved but checkout offers are not ready yet, Review offers opens with the manual offer form:

Banner reminder: On the Program payouts and Publish sections, if offers are still missing you will also see: Purchasable offers still needed.
After your first publish, offer work moves to the studio (see below) — not back through the onboarding wizard. Profile, artwork, offers, and payouts stay on separate pages.
Storefront link
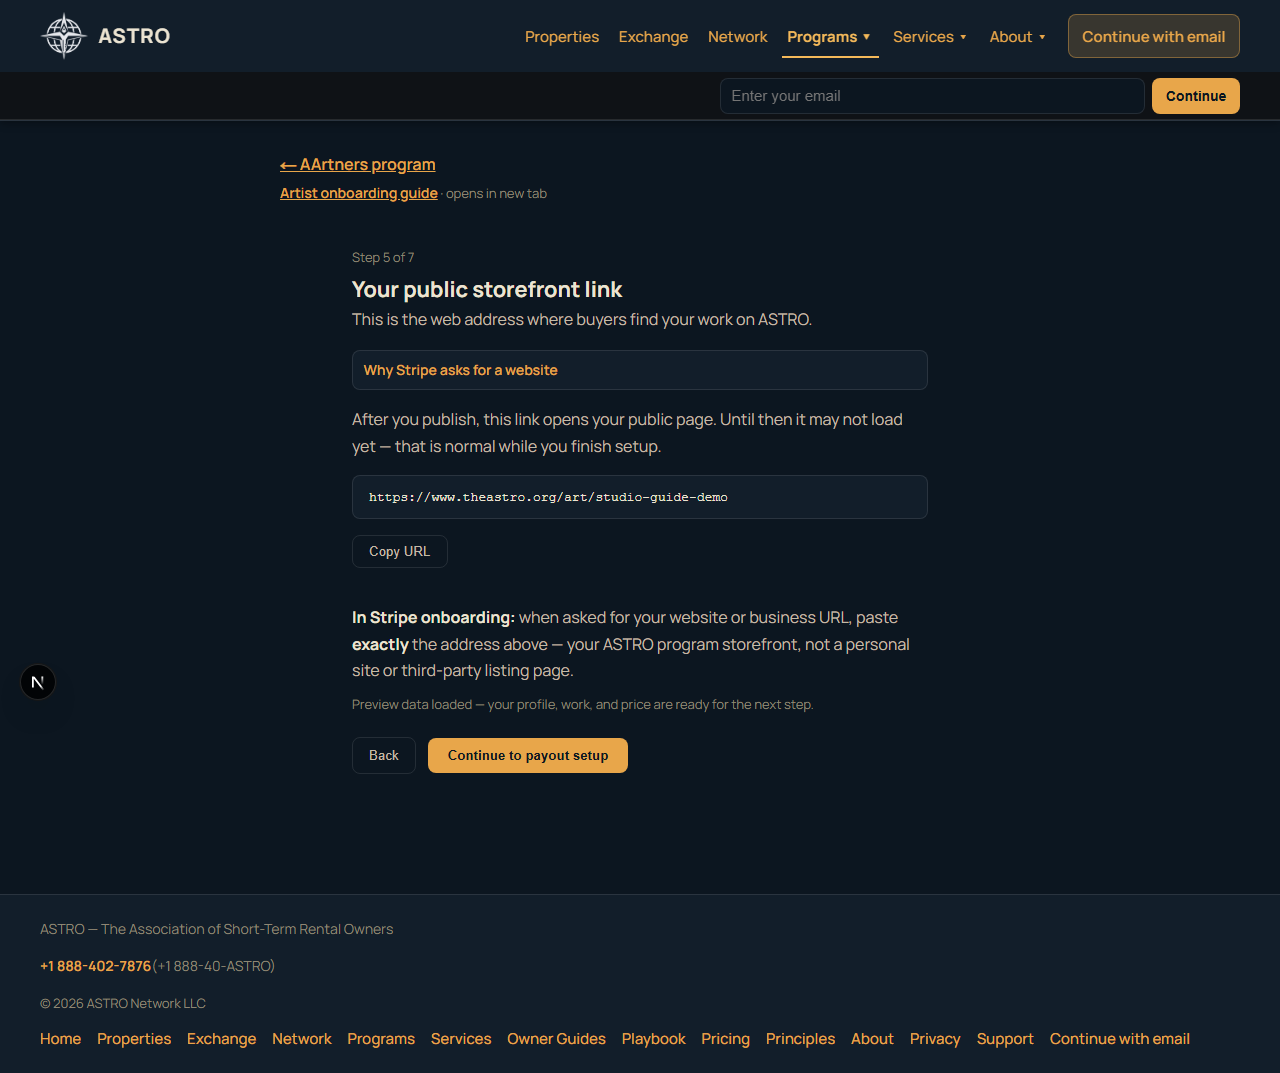
- Copy
https://www.theASTRO.org/art/{your-slug} - Paste this exact URL when Stripe asks for your business website — not Instagram, not a marketplace listing.
- Until you publish, the link may not load publicly yet; that is normal.
Program payouts
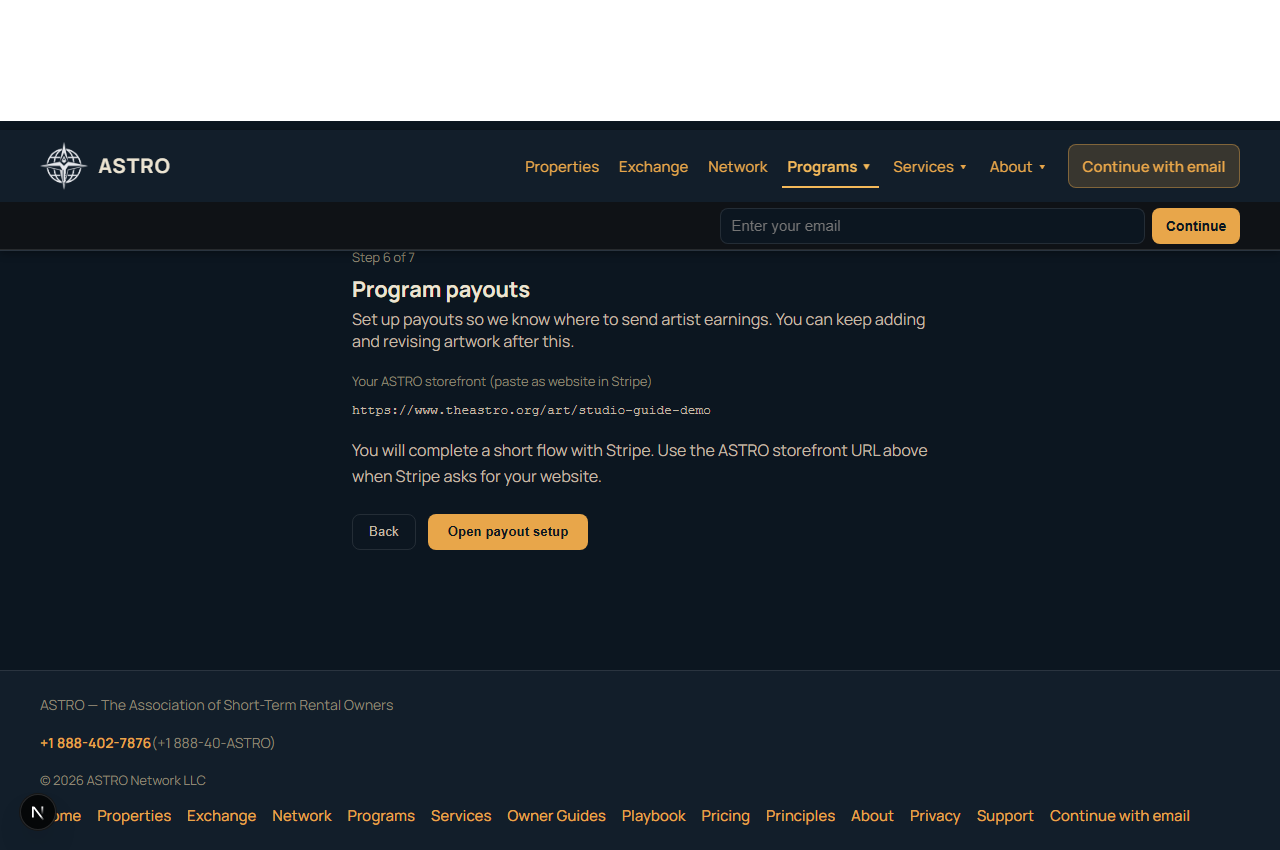
- Open Set up payouts with Stripe (Stripe Connect Express).
- Complete identity and bank details in Stripe’s flow.
- Return to ASTRO — payout status updates to ready when Stripe confirms.
You can add more artwork and offers before or after this step.
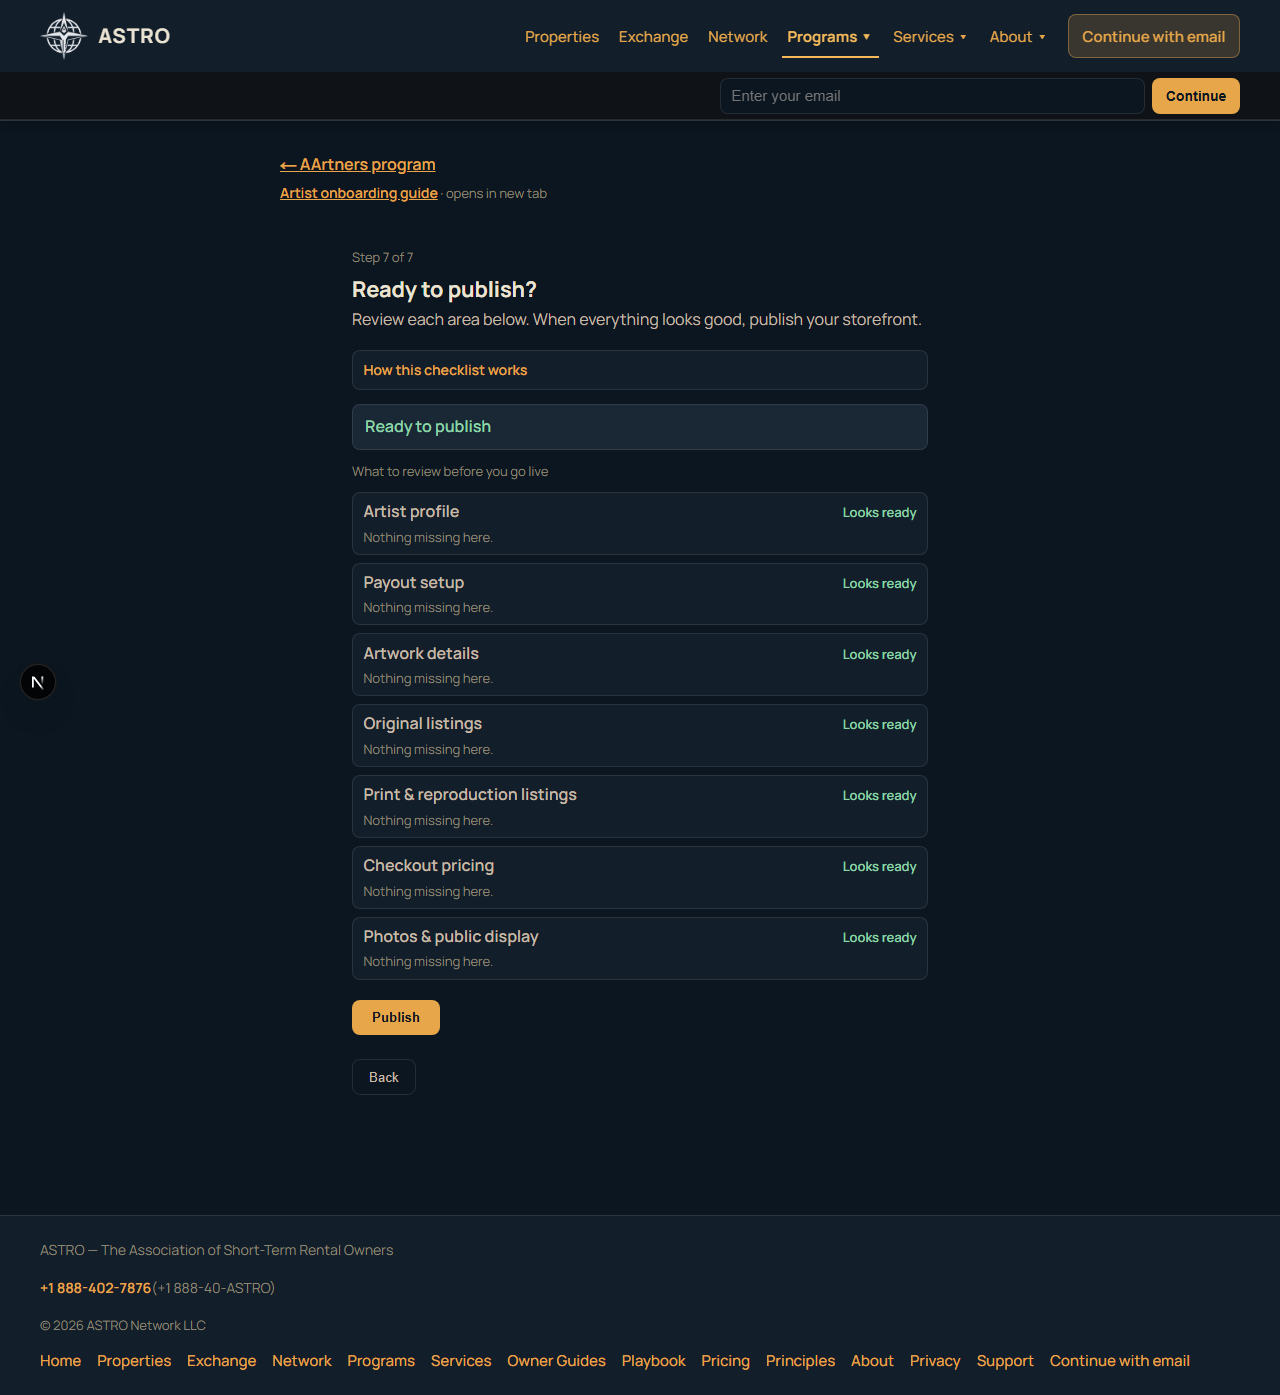
Publish
The checklist covers these areas:
- Artist profile
- Payout setup
- Artwork details
- Original listings
- Print & reproduction listings
- Checkout pricing (Stripe catalog prices)
- Photos & public display
Green rows mean nothing is missing in that area. Needs attention rows link you back to the right section (Artwork setup, Review offers, or Program payouts).
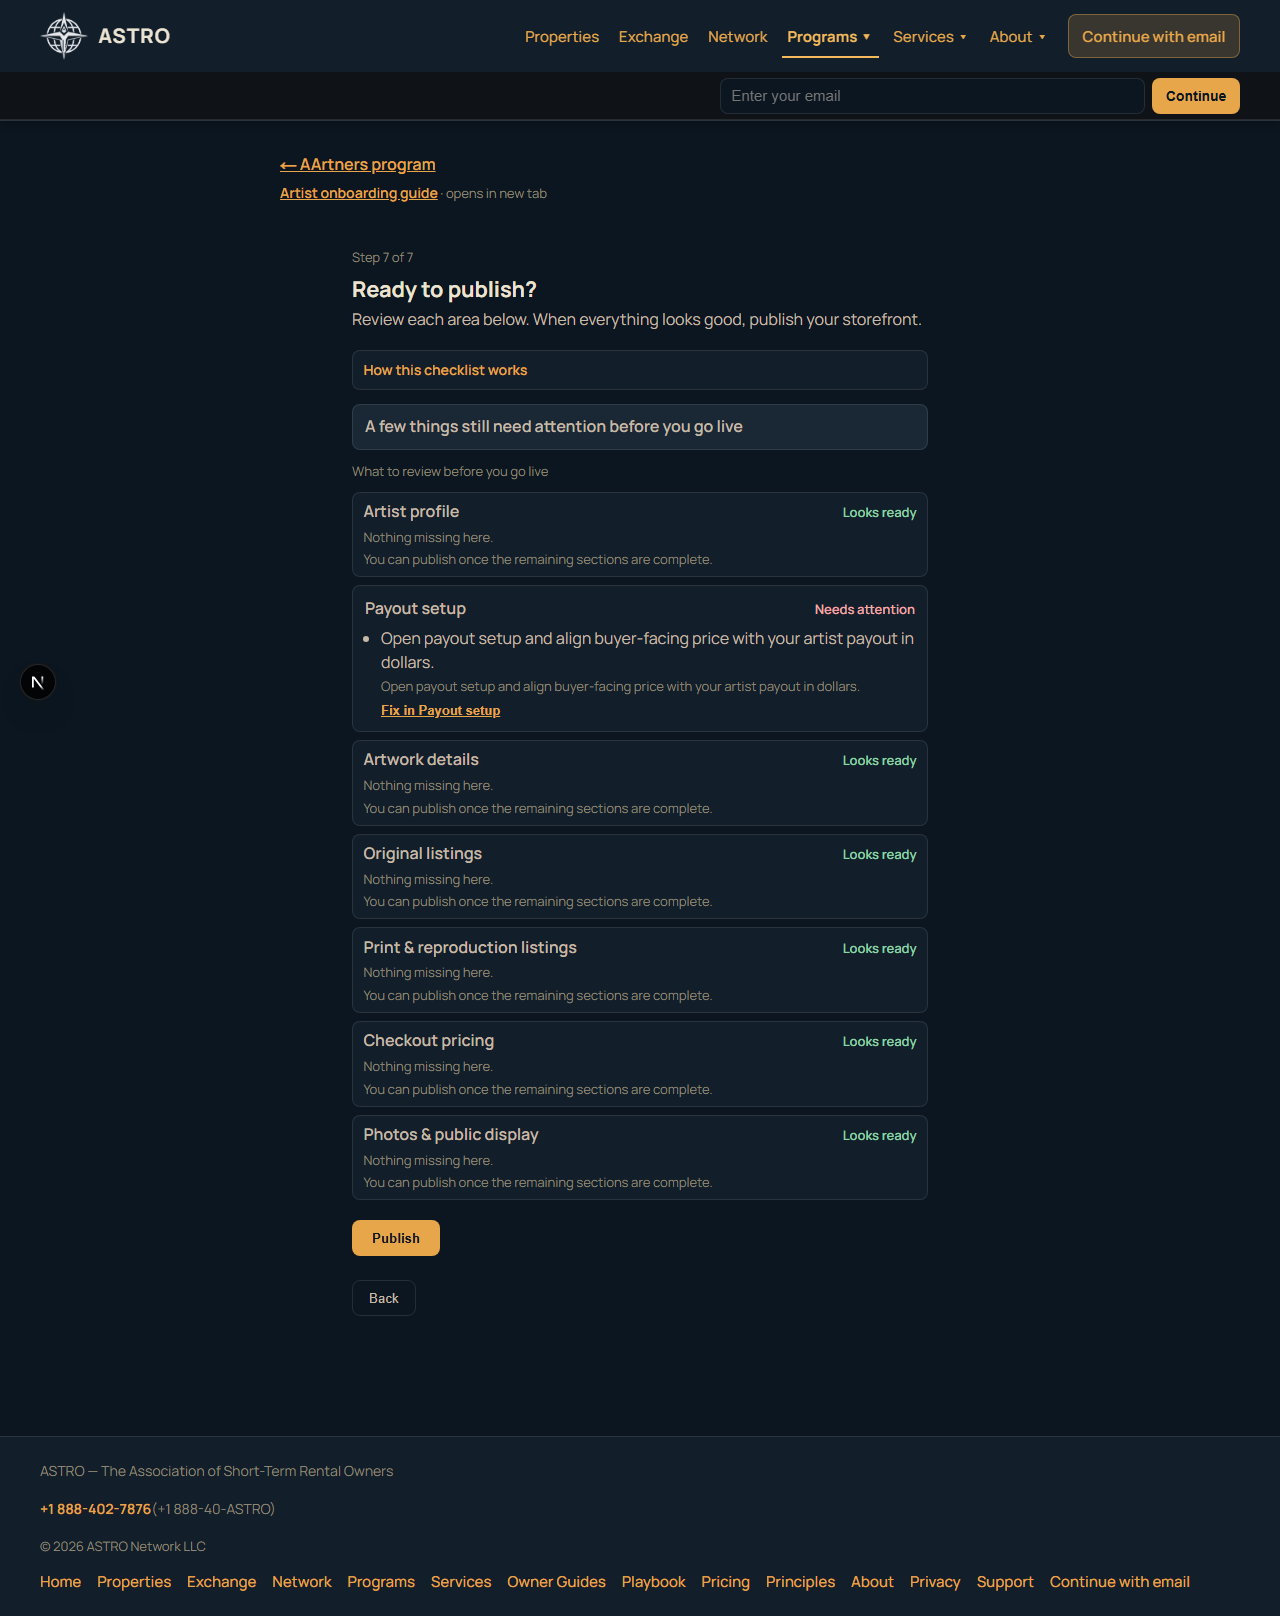
When everything is clear, tap Publish. Your storefront goes live at /art/{slug}.
Original-only path (fastest first publish)
Many founding artists start with Original only:
- Artwork setup — pick Original tier only, name your price, set dimensions
- Review offers — confirm one original sale offer
- Program payouts — Stripe payouts
- Publish — publish
Prints and merch can be added later from Manage or by re-running artwork setup.
After publish — your AArtners studio
Studio home: www.theASTRO.org/programs/aartners/manage
Onboarding is a one-time path to first publish. Day-to-day work happens in the studio — separate surfaces, not one combined wizard.
Open your AArtners storefront (readiness checklist)
The studio home shows Open your AArtners storefront with four setup areas:
| Area | What it means | Where to go |
|---|---|---|
| Storefront profile | Public artist identity and cover | /programs/aartners/manage/profile |
| Artwork catalog | At least one work with image and description | /programs/aartners/manage/artworks or Add artwork at /manage/artworks/new (image upload first) |
| Sales options | At least one configured offer | /programs/aartners/manage/offers |
| Payout setup | Stripe Connect ready for program payouts | Onboarding payout step (?intent=payout) |
When all four are complete, you are ready to publish (if not live yet). Storefront open means your public page is actually published — not just “ready.”
Configure sales options from a work
For each artwork, choose what can be purchased — or keep the work in your portfolio without a sale offer.
Per-work doorway: /programs/aartners/manage/artworks/{work-id}/offers/new
- You see this work in context.
- You choose an offer type (only types ASTRO supports today):
- Original sale — one-of-a-kind; does not transfer copyright or reproduction rights
- Authorized reproduction — explicit authorization; display photo is not automatically reproduction-ready
- Merch reproduction — authorized merch lane
- Embellished giclée — hand-finished reproduction with edition options
- Portfolio only — visible without a checkout product (no fake product row)
- You complete the fields for that offer type and save.
Offers hub: /programs/aartners/manage/offers lists configured offers and works that still need sales options.
Not every work must be for sale. Completing payout setup does not guarantee sales or earnings.
Quick links
| Task | Route |
|---|---|
| Studio home | /programs/aartners/manage |
| Edit profile | /programs/aartners/manage/profile |
| Manage artworks | /programs/aartners/manage/artworks |
| Add artwork (image first) | /programs/aartners/manage/artworks/new |
| Manage offers | /programs/aartners/manage/offers |
| Public storefront | https://www.theASTRO.org/art/{your-slug} |
Buyers find you on the public directory and your /art/{slug} page.
Questions: prudence@theASTRO.org